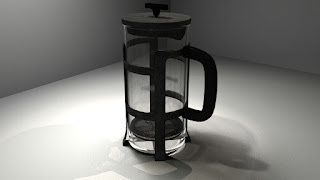
Primary Objectives: Produce a high-quality 3D model. Create materials for glass, metal, and plastic to look photoreal. Achieve high-quality lighting and final renders.
Techniques and Methods:
General: Part of the reason I chose to model a French Press is that I had been using one every day for the last month or so and it was a familiar, everyday object. It is a simple design, yet it offers a fair amount of complexity. I frequently try to tackle overly large projects that I end up floundering on or losing interest in halfway through. The French Press to me appears to be simple enough to not require a huge investment of time, but would also offer me a few challenges. My primary focus here, however, was not on the model itself, but rather on the textures, materials, and rendering. So while I would still have to create a moderately complex model, I would not get so caught up in it, that I would lose sight of my objective goal.
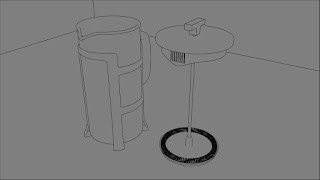
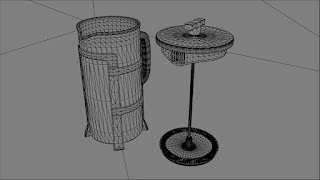
Modeling: The French Press is a fairly simple design: a glass body, an outer metal frame handle, plunger, and mesh. I decided to proceed by creating low poly objects for each individual piece. I would do my best to avoid overly complicated single-piece meshes.
The body was fairly simple to create. I used a cylinder and extruded the sides upwards. At the top, I created a simple lip and then pulled a few vertices forward and down to create the spout. Upon smoothing the mesh, I got the desired results.
The frame was created via a cylinder as well. However, I used a subtractive method to create the frame. I inserted polygons as I needed, and then deleted all faces that I did not want. From there I used the bridge tool to close open spaces and then smoothed my object.
The handle was a simple matter of box modeling to which I applied a bevel to the outer edges.
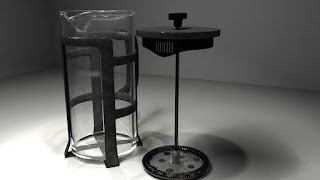
The entirety of the plunger apparatus was the most complex part to make. I utilized several different objects. Most were cylinders that I then manipulated to the proper shape. For the coil, I created a coil shape, and then applied a nonlinear bend deformer to create the circular shape. For the part of the top that allows liquid to flow out, I utilized difference booleans to cut away the shape without creating too much of a mess of the geometry.
Because all the pieces are individual, it allowed me to easily UV, and ultimately texture the model. As well, it had a lot of flexibility when it came to rigging in the end.
Rigging: While mostly unnecessary, I decided I wanted this model to have the ability to be utilized as a fully animatable prop. As such, I created controls for each part of the model that should be able to move: entire object, plunger, lid, and glass. As well, I wanted there to be the option for more complex animation, so there are controls that allow the press to be moved from the base, as well as from the handle - depending upon how it is being manipulated within the scene.
Materials & Textures: Typically, I create basic textures and use presets with mia_material_x. These are great starting points, so I decided to go further in-depth with this.
The glass container I started off with a solid glass preset, but then I created maps for the glossiness, refraction, and reflection to create smudges and hard water stains. Upon initial renders, the effect was a little too much, but I did like it. I toned back the degree to which it showed and I'm quite happy with the final result. Depending on the angle of the light, the smudges show more or less.
The metal frame and lid I created from scratch with no presets. While I'm happy with the results, I did not get the exact results I wanted. I would like to get a stronger look of smudges than I achieved, but ultimately, I like what I got.
The look of the plunger I am very pleased with and am quite happy with the final look. I realized during the texturing phase that I had forgotten to model an extra piece - but rather than go back and model it, I decided I would try and tackle the issue through texturing. Utilizing bump maps, I was able to create the exact effect I was looking for with less geometry.
Render: Usually, I just slap on a physical sun and sky and make standard adjustments from there. But this project was about materials and rendering, so I decided to really work with the lights. I used three lights in the scene. Area-Light-One to provide a general lighting area and basic illumination. I used a wide Spotlight with a warm color to provide the primary light source and a second Spotlight to generate the ambient occlusion and caustics.


Conclusion: In general, I'm quite happy with how the project came out. I wanted to challenge myself and not allow myself to dawdle too much, so I only gave myself about 6 hours over the course of 3 days once I had finished with my primary projects.
The model itself retains a high amount of detail without getting too dense in the mesh. It remains efficient with a clean edge flow.
I'm happy with the materials and textures, though there are areas I would like to work on. I am not as happy with my metal as I would like to be, but it still achieves the look I was after. It is something that I intend to focus further on in subsequent projects. The glass texture I am very happy with and look forward to experimenting further with different ideas, perhaps embossed glass or something of the likes.
The renders also left me quite happy. There is a slight bit of graininess in the area around the press, but it is purely lambert and was not a focus at all. The model rendered how I wanted and I am happy.
So I achieved what I wanted to, and now have a little more direction in where I would like to explore and improve.