
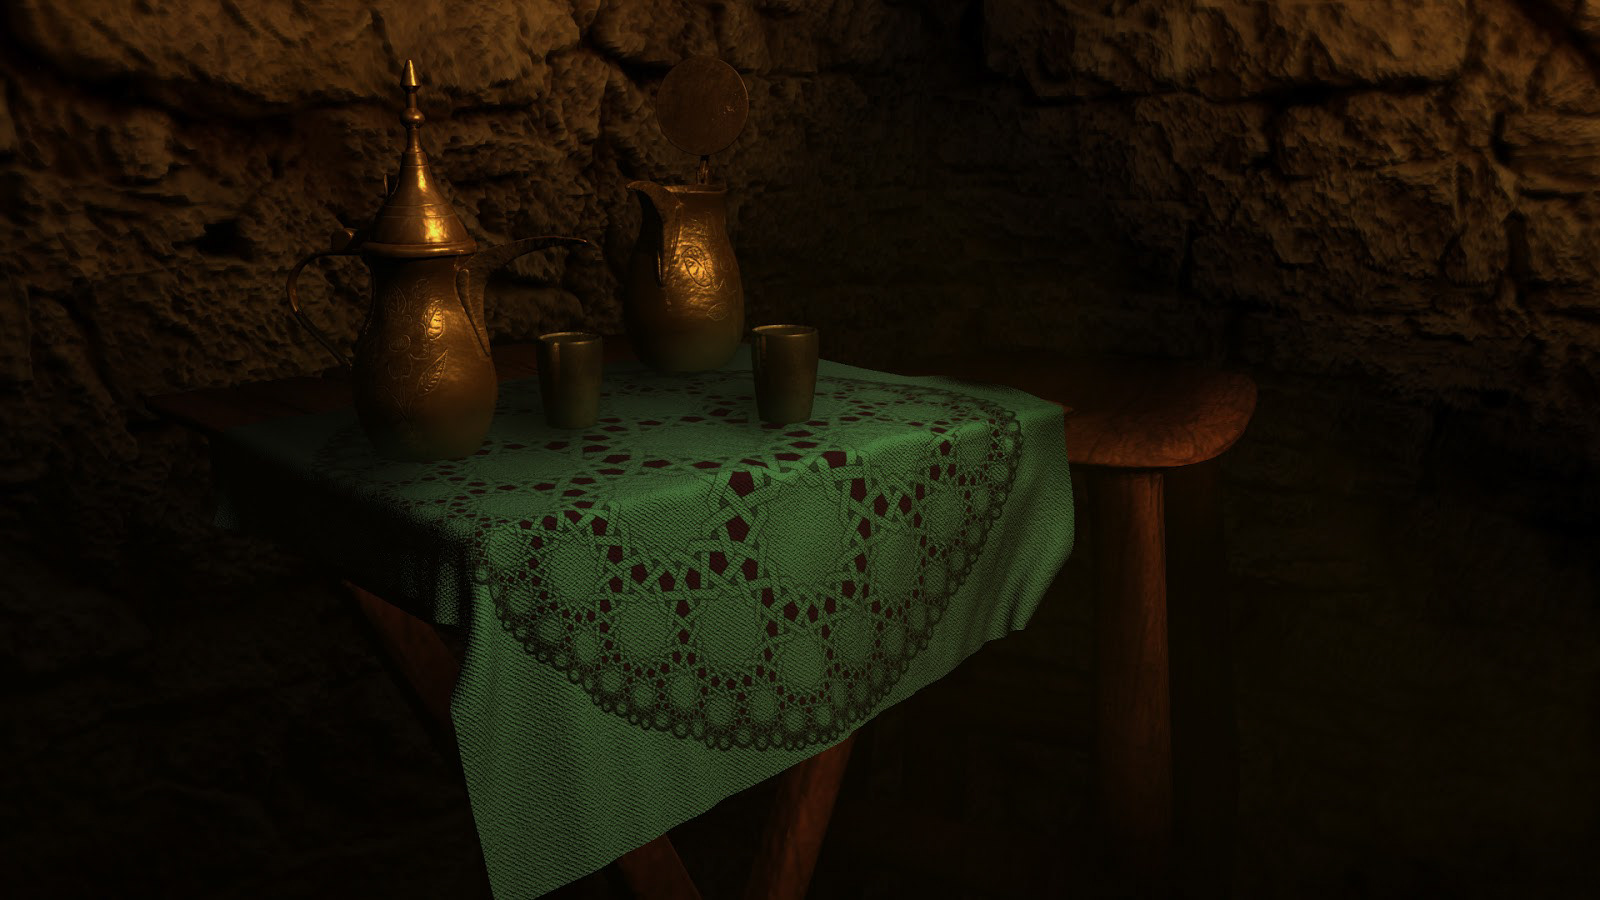
The murmur of voices in a dimly lit cafe. The drone of an oud in the distance. The heavy air of hookah smoke floating through the air, with the pungent aroma of cinnamon and anise. Tea poured from a relic teapot, on a worn, rough-hewn, wooden table, in an intimate corner of Istanbul. This is the feeling I want to evoke.
Objective: In my recent projects, I have come across two realizations. One, my metal textures are severely lacking. Two, I keep trying to bite off more than I can chew. So what I really want to accomplish in this project is to produce an exceptional metal texture.
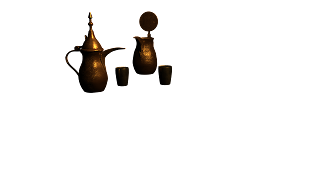
I’m inspired by what looks to be a Turkish (probably Cypriot) coffee pot. It is old, and tarnished, and looks to be made of bronze. Though bronze does not tarnish, so it is some other sort of metal.
My key focus will be on creating the texture. I want the model to also sell the fact that the object is a little beat-up and worn, but the texture is the key here.
After that, I want to create an atmosphere with my lighting/rendering. I want to create a night scene, lit by candle or lantern - something dim and warm. The scene itself will be minimal and is not the focus of this project - though I do intend to make it nice.
Look Dev: Upon initial, closeup viewing of my reference, it turns out it is not tarnished at all, just dusty (so it is indeed bronze). This is not exactly what I want, but it still provides excellent references. While it is not tarnished, there are small spots and dents throughout which I will replicate.
The teapot has small engravings which I will be able to tackle through a displacement map. I do not plan on attempting to utilize Zbrush at all in this project.
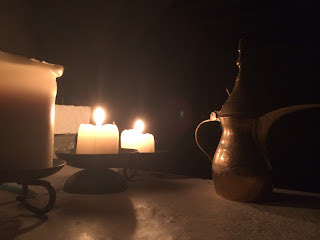
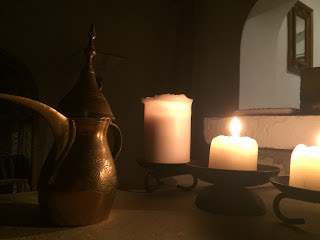
I tested the lighting that I wanted by putting the coffeepot in a dark room and shooting it with my iPhone against three lit candles. It should provide a great reference when I get to the lighting stage.
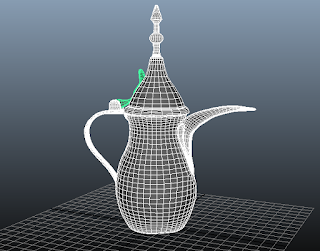
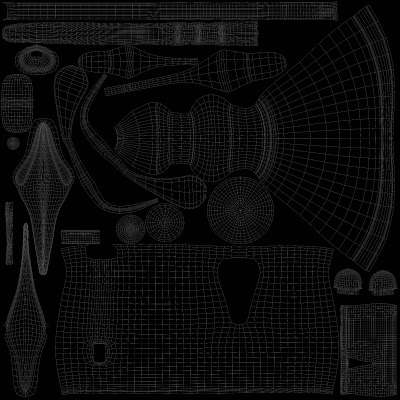
Modeling: I created the model by starting off with a cylinder that I divided into ten segments with three cap segments. I used this to create the primary body of the pot. I then deleted faces to create a hole and then extruded them out to create the spout. For the handle, I did simple extrusions until I got the basic shape I wanted.
The top was created much the same way, starting with a cylinder. I then extruded up and adjusted the scale of my edge loops to create the curves.
The hinge was created with a simple box that I then added various edge loops and adjusted the shape to meet.
In preparation for the high-poly smooth, I added numerous edge loops to reinforce hard edges. I also utilized bevels to create the divots in the handle.
During the smoothing process, I ran into an awkward issue during which time Maya either crashed or generated new (unwanted) geometry. Trying to delete this geometry resulted in a crash so I had to pursue other methods to smooth it. Ultimately, I found that I needed to switch from an Open-Subdiv Catmull Clark method to a Maya Catmull Clark smoothing. The result fixed my issue, though did generate far more polygons than I was anticipated. In the end, this was not an issue, nor undesired, but had this been a different model or if I’d had polygon limits, it would have presented a problem.
To create a little extra variation, once I had my final high poly model, I then utilized soft select to create dents, and other imperfections evident of a hand-hammered pot.
Texturing: I UVd the model entirely within Maya. I decided to create one large map, encasing all three objects, as opposed to three separate maps, to ensure continuity of texture and contrasting scale. Due to having three objects together, as well as no limit to render, I chose to create a 4k map to use.
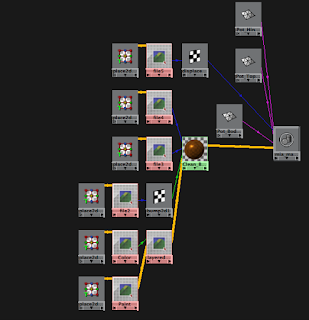
I started off with a mia_material_x. I have used this in past to good effect, however, I usually don’t modify the materials much beyond adding a color map or a bump map - generally, I use the presets. However, I know that they do well with Mental Ray, so that is where I started. I spent a bit of time trying to perfect the texture, but I just couldn’t get it to what I wanted. The material looked pretty much like my reference. Since bronze doesn’t rust or tarnish this was technically correct, but not what I was going for. I applied a hand-drawn image of a flower as a displacement map and then used a layered color map to add paint inside the flower engraving. While the resulting texture looked fine, it wasn’t what I wanted - plus the hypergraph seemed a little cluttered for such a simple material.
So I decided to create another material to see if it would fare better. This time I chose a Blinn material to begin with. I used a layer node to mix color and diffuse maps for my resulting color map and then used another layer node on top of that to add the paint for my displacement map. The Blinn seemed to produce better results than the mia_material_x but still wasn’t quite what I wanted. However, I was happy enough with my result for the scene I wanted to create.
Additional Assets: Once the teapot was finalized, I then went on to create the additional assets I wanted for my scene. I decided to keep the scene light so only created a few other items.
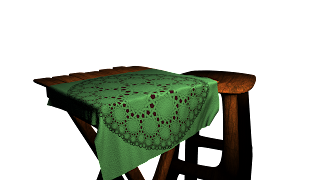
I made a rough wooden table and stool. Both of these items I made by starting off with boxes and getting a rough shape. Then I selected random edges across the models and created bevels and chamfers. With these created, I then smoothed my mesh and went into soft select mode and moved vertices around to give it a more organic and worn feel. For both of these models, I created a single material that I applied to both. Because of how dark the scene was, and the distance away, I elected to use a Normal map instead of a displacement map.
Atop the table, I created a simple cloth. This was created procedurally in Maya. To it, I applied a normal map and color map to achieve the look I wanted. I also created a teacup model which was basically just a cylinder. For its textures, I followed the same format and files as I used for the teapot, but I altered the colors to be a more gray look.
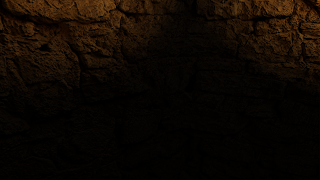
The wall and floors were both simple planes upon which I projected a strong displacement map utilizing stone textures I got from the internet.
Lighting / Rendering: I had fun with the lighting for once on this project. I knew that because this was supposed to be a dark night scene, there would be no need to create an area or spotlight. Instead, I created a volume light and two point lights. Both lights were set to an orange color as I wanted them to be mimicking the color that a lantern would give off. Once I got the lights set up and was happy with the result I began the rendering process.
Rendering was interesting this time around. I ran into an odd issue, half of my objects would render correctly in Mental Ray, and the other half would only render correctly in Maya Software. Ultimately, I decided to create various render layers for the assets, and comp them together in post. This actually worked out quite well for me.
The post comp allowed me to have more control over the individual items of my scene. I was able to add slight blurs to the background as well as a very light smokey atmosphere. The table and cloth I felt were too bright initially, so I brought them down some as well. Because of the nature of my layers, I did lose my shadows though. But, luckily, I did have a beauty shot for reference, so I used that to go in and manually paint the shadows and reflections on the table from the pots and cups.
Conclusion: So looking back at the objectives I set for myself in this project, I am pretty happy. My metal materials, while not the perfect nor exactly look I was going for, do sell me on the metal texture, as well as look pretty spot on to my reference.
The scene I was going for I think I hit perfectly. I love the atmosphere and lighting I managed to achieve, and I’m very happy at how I was able to keep the scene very minimalist. As well, I am happy at my ability to create simple workarounds for the various problems that arise, rather than sweating the small stuff.
I learned a bit in the creation of the materials and objects, and am feeling far more comfortable in lighting and rendering abilities. I have just now seen that Maya 2017 is switching to Arnold Renderer as the default render, so I will have to make a point of learning that very soon, but that is the nature of this industry.